
In the ever-evolving world of artificial intelligence, OpenAI ChatKit emerges as a game-changer for developers looking to integrate conversational AI into their applications seamlessly. If you’ve ever considered building an interactive chatbot, virtual assistant, or a customer support AI, then OpenAI ChatKit can significantly simplify the process. This blog will walk you through everything you need to know about OpenAI ChatKit, from its architecture and features to step-by-step integration, best practices, and advanced configurations. By the end of this post, you will have a comprehensive understanding of how to utilize OpenAI ChatKit effectively in your projects.
What is OpenAI ChatKit?
OpenAI ChatKit is a toolkit designed to help developers create and integrate conversational AI (chatbots) powered by OpenAI’s advanced models into their applications. Whether you’re building a simple chatbot for customer support or a sophisticated virtual assistant, OpenAI ChatKit offers everything you need to get started. It provides a smooth user experience, customizable UI components, and robust backend APIs to process user inputs and generate AI-driven responses.
The OpenAI ChatKit platform simplifies the process of creating chatbots and virtual assistants, enabling developers to focus on building interactive experiences rather than worrying about AI models, infrastructure, and scaling issues.
Key Features of OpenAI ChatKit
Before diving deeper into the integration process, let’s take a look at the key features that make OpenAI ChatKit a preferred choice for developers:
- Ease of Integration: OpenAI ChatKit offers a straightforward API that makes it easy to integrate conversational AI into any application. It can be set up quickly and supports various frameworks and platforms.
- Customizable UI: The platform offers a pre-built chat UI, which can be customized according to your brand’s requirements. You can change colors, fonts, and even add custom components to fit your design needs.
- File and Thread Storage: OpenAI ChatKit allows you to store files and manage conversation threads efficiently. This is especially helpful when you want to save user interactions for later use or enable the AI to remember previous conversations for context.
- Real-Time Interactivity: With OpenAI ChatKit, your chatbot can interact with users in real time, providing instant responses to their queries, making it ideal for customer support, FAQs, or even interactive games.
- Advanced Language Capabilities: Built on OpenAI’s GPT models, OpenAI ChatKit can understand and generate human-like responses, making interactions more natural and intuitive.
- Robust API Access: Developers can access and leverage OpenAI’s rich set of APIs to power the AI’s conversation. This includes the ability to send and receive messages, adjust parameters, and connect with external services.
OpenAI ChatKit Architecture: Deep Dive into How It Works
Overview of OpenAI ChatKit Architecture
To better understand how OpenAI ChatKit works, let’s break down the architecture into several key components. These components interact with each other in a structured way to ensure that developers can create efficient, scalable conversational agents.
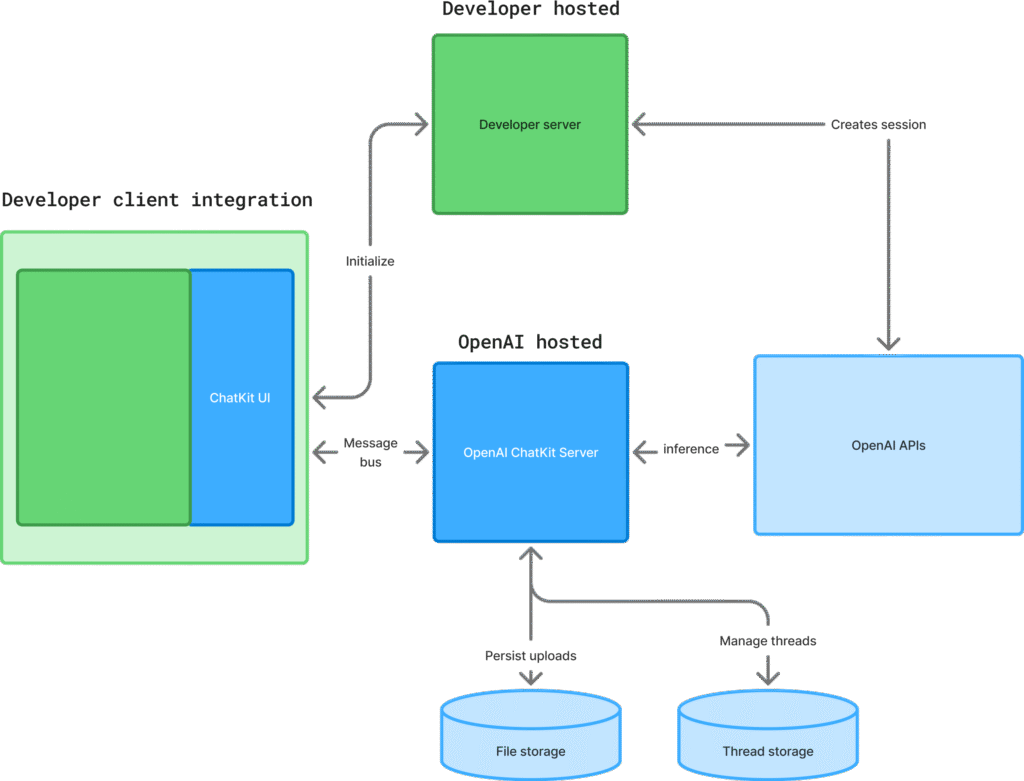
Here’s a high-level breakdown of the architecture:
- Developer Client Integration (Developer Hosted):
- Developer Server: This is where you host the server-side logic for your application. The server is responsible for managing the backend operations, such as user input handling, database interactions, and communication with OpenAI ChatKit APIs.
- ChatKit UI: The user interface where users interact with the chatbot. This can be embedded into your website, mobile app, or web-based application. It provides a seamless chat experience for users and sends messages to the backend.
- OpenAI Hosted Components:
- OpenAI ChatKit Server: This is the central server that communicates with your application. It handles the interactions between the developer’s system and OpenAI APIs. It processes requests, manages sessions, and facilitates conversations between the user and the AI.
- OpenAI APIs: These APIs are the heart of OpenAI ChatKit, providing the AI-powered natural language processing (NLP) and response generation. Developers can call these APIs to get real-time responses from the AI models.
- Data Storage:
- File Storage: OpenAI ChatKit allows storing files shared during a conversation, such as images or documents. This is particularly useful when your chatbot needs to send or receive files (e.g., customer support scenarios).
- Thread Storage: This is used to store conversation histories (threads). Storing the thread helps the AI remember the context of past conversations, which allows for more meaningful and context-aware interactions.
Detailed Explanation of Each Component
Let’s explore each of these components in more detail.
Developer Server
The developer server is the backend of your application. It connects the frontend chat interface to OpenAI’s services. The server can be built using any backend technology such as Node.js, Python, Ruby on Rails, or even serverless frameworks. The server handles several key tasks:
- Managing User Sessions: Every time a user interacts with the chatbot, the developer server creates a new session or updates an existing one. Session management ensures that the AI remembers who the user is and can provide contextual responses based on previous messages.
- Handling Incoming Requests: The server processes messages sent by the user and forwards them to the OpenAI ChatKit API for processing. Once a response is generated, it sends the response back to the frontend UI.
- Authentication: The server ensures secure access to OpenAI APIs by verifying API keys and managing user authentication.
ChatKit UI
The ChatKit UI is the user-facing component that displays the chat interface on your application. You can integrate ChatKit UI into your website, mobile app, or any other platform that supports HTML, CSS, and JavaScript. The UI is customizable, allowing you to change the appearance, layout, and behavior of the chat window.
The UI has several components:
- Message Area: Where the conversation between the user and AI takes place.
- Input Field: Where the user types their message.
- Buttons/Options: You can customize buttons for quick replies, menu options, or commands.
- Notifications: These provide status updates to users, such as when the AI is processing a request.
OpenAI ChatKit Server
The OpenAI ChatKit Server acts as the intermediary between your application and OpenAI’s backend. When your developer server sends a user message to OpenAI APIs, the ChatKit Server processes this request, maintains the session, and handles the flow of the conversation. It ensures that everything is running smoothly and that the data flows in the right direction.
OpenAI APIs
The OpenAI APIs are the key components that power the AI responses. They are based on OpenAI’s large language models, like GPT-4, and handle everything related to natural language understanding and generation. These APIs process the user’s input and generate contextually appropriate responses.
You can use various OpenAI APIs depending on your needs:
- Completion API: This generates text completions based on the user’s input. It is useful for tasks like chatbot responses or content generation.
- Fine-Tuning API: If you need to train the model on specific data, you can fine-tune it to meet your exact requirements.
- Embeddings API: This allows the AI to understand and compare text, which is useful for tasks like question answering or semantic search.
Data Storage
Data storage in OpenAI ChatKit plays an essential role in ensuring that users have a continuous, personalized experience. There are two primary types of storage in ChatKit:
- File Storage: You can store files sent and received during conversations. This is essential in scenarios where the chatbot handles documents or images, such as a customer service chatbot that processes invoices or support tickets.
- Thread Storage: Each conversation is stored as a thread, which ensures that the AI can remember the context of past interactions. This is a key feature for creating engaging, context-aware conversations.
How OpenAI ChatKit Works
To better understand how everything works together, let’s take a closer look at the flow of a conversation from the moment a user interacts with the chatbot.
- User Input: The user types a message into the ChatKit UI.
- Frontend to Backend Communication: The message is sent to the backend server where the developer logic processes it. This may involve checking user authentication, processing the data, or triggering specific actions.
- Backend to OpenAI API: The backend forwards the message to the OpenAI ChatKit Server, which then interacts with OpenAI’s APIs to generate a response based on the user’s input.
- AI Response: The OpenAI API generates a response and sends it back to the ChatKit Server.
- Display the Response: The response is sent back to the frontend UI, where it is displayed to the user in real time.
- Store Data: The conversation is stored as a thread, and any files exchanged are stored in the appropriate storage location.
This entire process occurs in real-time, enabling fast and dynamic interactions between users and the AI.
Setting Up OpenAI ChatKit: A Step-by-Step Guide
Now that you understand the architecture of OpenAI ChatKit, let’s walk through the steps of setting up and integrating it into your application.
Step 1: Create an OpenAI Account
Before you can access OpenAI ChatKit, you need to create an OpenAI account. Follow these steps to get started:
- Visit OpenAI
- Once signed up, you’ll gain access to the OpenAI dashboard, where you can manage your API keys, monitor usage, and access documentation.
Step 2: Obtain the OpenAI API Key
To interact with OpenAI ChatKit and access the APIs, you need an API key. Here’s how to get it:
- Log in to your OpenAI account.
- Go to the “API Keys” section in the dashboard.
- Click on “Create new API Key.”
- Copy the generated API key and keep it in a secure place. You’ll need this key to authenticate API requests.
For More details – read our blog – https://muneebdev.com/openai-api-key-setup-2025/
Step 3: Integrate OpenAI ChatKit into Your Application
Once you have your API key, you can start integrating OpenAI ChatKit into your application. Here’s how you can do it using Node.js:
- Install Required Packages:
npm install openai express
- Set Up Server (Example using Express.js):
const express = require('express');
const { OpenAI } = require('openai');

const app = express();
const openai = new OpenAI({ apiKey: 'your-api-key' });

app.post('/send-message', async (req, res) => {
    const { message } = req.body;
    const response = await openai.chat.create({
        messages: [
            { role: "user", content: message }
        ],
    });
    res.send(response);
});

app.listen(3000, () => {
    console.log("Server is running on port 3000");
});
- Frontend Integration: You can embed the ChatKit UI in your frontend and configure it to send and receive messages from your server.
Practical Guide to Implementing OpenAI ChatKit: Step-by-Step
In this section, we will walk through how to integrate OpenAI ChatKit into your web application. We will cover two frameworks: Laravel (PHP) and Flask (Python). These frameworks are commonly used by developers, and they have robust documentation and support, making them great choices for beginners.
1. Setting Up OpenAI ChatKit with Laravel (PHP)
Prerequisites:
- Basic knowledge of PHP and Laravel.
- An OpenAI account with an API key.
- PHP 7.3+ and Composer installed on your system.
Step 1: Install Laravel
If you haven’t installed Laravel yet, you can do so by following these steps:
- Install Composer (PHP dependency manager) if you haven’t already. You can download it from here
composer create-project --prefer-dist laravel/laravel openai-chatkit
cd openai-chatkit
Step 2: Install Guzzle HTTP Client
Laravel uses Guzzle for making HTTP requests. We will use Guzzle to communicate with the OpenAI API.
To install Guzzle, run the following command in your Laravel project directory:
composer require guzzlehttp/guzzle
Step 3: Configure OpenAI API Key
In your Laravel project, you need to store your OpenAI API key. The best practice is to store it in the .env file to keep it secure and out of the version control system.
- Open your
.envfile. - Add the following line (replace
your-api-key-herewith your actual OpenAI API key):
OPENAI_API_KEY=your-api-key-here
Step 4: Create the Controller
Now, let’s create a controller to handle the chat functionality.
Run the following command to create a controller:
php artisan make:controller ChatController
In the ChatController.php file, add the following code:
<?php

namespace App\Http\Controllers;

use Illuminate\Http\Request;
use GuzzleHttp\Client;

class ChatController extends Controller
{
    public function sendMessage(Request $request)
    {
        // Get message from user
        $userMessage = $request->input('message');

        // Initialize Guzzle client
        $client = new Client();

        // Call OpenAI API to get a response
        $response = $client->post('https://api.openai.com/v1/completions', [
            'json' => [
                'model' => 'gpt-4', // You can also use other models like gpt-3.5-turbo
                'prompt' => $userMessage,
                'max_tokens' => 150,
                'temperature' => 0.7,
            ],
            'headers' => [
                'Authorization' => 'Bearer ' . env('OPENAI_API_KEY'),
            ]
        ]);

        // Decode the response
        $data = json_decode($response->getBody(), true);

        // Return the AI response
        return response()->json([
            'response' => $data['choices'][0]['text']
        ]);
    }
}
This code sends a POST request to the OpenAI API using the Guzzle HTTP client and gets a response based on the user’s input.
Step 5: Set Up Routes
Now, you need to define a route that will handle user input and display the AI’s response.
In the routes/web.php file, add the following route:
use App\Http\Controllers\ChatController;

Route::post('/chat', [ChatController::class, 'sendMessage']);
Step 6: Create the Frontend
Create a simple form to capture user input and display the AI response. In your resources/views directory, create a file called chat.blade.php:
<!DOCTYPE html>
<html lang="en">
<head>
    <meta charset="UTF-8">
    <meta name="viewport" content="width=device-width, initial-scale=1.0">
    <title>OpenAI ChatKit</title>
    <script src="https://code.jquery.com/jquery-3.6.0.min.js"></script>
</head>
<body>

    <h1>Chat with AI</h1>
    <form id="chatForm">
        <textarea id="userMessage" placeholder="Ask me anything" required></textarea><br><br>
        <button type="submit">Send</button>
    </form>

    <div id="response"></div>

    <script>
        $(document).ready(function() {
            $('#chatForm').submit(function(event) {
                event.preventDefault();

                var message = $('#userMessage').val();
                $.post('/chat', { message: message }, function(data) {
                    $('#response').text('AI Response: ' + data.response);
                });
            });
        });
    </script>
</body>
</html>
This code creates a simple user interface where users can input a message, and the response from OpenAI is displayed below.
Step 7: Run the Application
Run the Laravel server with the following command:
php artisan serve
Navigate to http://127.0.0.1:8000/chat in your browser. You should see the chat interface. Type a message, and the AI response will be displayed.
2. Setting Up OpenAI ChatKit with Flask (Python)
Prerequisites:
- Basic knowledge of Python and Flask.
- Python 3.x installed.
- An OpenAI account with an API key.
- pip (Python package installer).
Step 1: Install Flask and OpenAI Library
Start by installing Flask and OpenAI’s official Python library. Open your terminal and run the following:
pip install Flask openai
Step 2: Create Flask Application
Now, create a new Python file called app.py and set up a basic Flask application. Here’s how the file should look:
import openai
from flask import Flask, request, jsonify

app = Flask(__name__)

# Set up your OpenAI API key
openai.api_key = 'your-api-key-here'

@app.route('/chat', methods=['POST'])
def chat():
    user_message = request.json.get('message')

    # Send the user message to OpenAI's API
    response = openai.Completion.create(
        engine="text-davinci-003",  # You can use different models like gpt-4
        prompt=user_message,
        max_tokens=150,
        temperature=0.7
    )

    # Extract the response text from OpenAI's API response
    ai_response = response.choices[0].text.strip()

    # Return the AI's response to the user
    return jsonify({'response': ai_response})

if __name__ == '__main__':
    app.run(debug=True)
Step 3: Create the Frontend
Now, let’s create a simple HTML page to interact with the Flask backend. Create a file called index.html in the same directory as your app.py:
<!DOCTYPE html>
<html lang="en">
<head>
    <meta charset="UTF-8">
    <meta name="viewport" content="width=device-width, initial-scale=1.0">
    <title>OpenAI ChatKit - Flask</title>
    <script src="https://code.jquery.com/jquery-3.6.0.min.js"></script>
</head>
<body>

    <h1>Chat with AI</h1>
    <form id="chatForm">
        <textarea id="userMessage" placeholder="Ask me anything" required></textarea><br><br>
        <button type="submit">Send</button>
    </form>

    <div id="response"></div>

    <script>
        $(document).ready(function() {
            $('#chatForm').submit(function(event) {
                event.preventDefault();

                var message = $('#userMessage').val();
                $.ajax({
                    url: 'http://127.0.0.1:5000/chat',
                    method: 'POST',
                    contentType: 'application/json',
                    data: JSON.stringify({ message: message }),
                    success: function(data) {
                        $('#response').text('AI Response: ' + data.response);
                    }
                });
            });
        });
    </script>
</body>
</html>
Step 4: Run the Application
- Start the Flask server by running:
python app.py
- Navigate to
http://127.0.0.1:5000/in your web browser to see the chat interface.
Now, when you send a message through the chat form, it will be processed by the Flask backend, which communicates with OpenAI’s API, and the AI’s response will be displayed on the page.
Conclusion
In this practical guide, we’ve walked through the steps required to integrate OpenAI ChatKit into a web application using both Laravel (PHP) and Flask (Python). Whether you’re building a chatbot for customer service, a personal assistant, or an AI-powered FAQ system, OpenAI ChatKit provides you with a robust, easy-to-use platform to power natural language interactions.
We covered the complete process from setting up your development environment, obtaining your OpenAI API key, and creating both the backend and frontend components of your application. By following this guide, even those with little experience in AI or web development can implement a basic conversational AI system using OpenAI’s powerful models.
The flexibility of Laravel and Flask allows developers to scale and customize the solution as needed, making it ideal for both small projects and large applications. Whether you choose to use Laravel or Flask, you now have the foundational knowledge to get started with OpenAI ChatKit and explore its potential.
The power of OpenAI’s language models combined with the ease of integration provided by ChatKit opens up numerous possibilities for developers and businesses. So, if you’re looking to build smarter, more engaging applications, integrating AI-driven chat functionality with OpenAI ChatKit should be a top consideration.
We hope this guide helped you get started on your journey of building intelligent AI-powered chat applications. If you have any more questions, don’t hesitate to refer to the FAQ section below or dive deeper into the official documentation for further customization options.
Frequently Asked Questions (FAQs)
1. What is OpenAI ChatKit?
OpenAI ChatKit is a toolkit developed by OpenAI to help developers easily integrate conversational AI into their applications. It includes pre-built components for handling chat interfaces and backend communication with OpenAI’s API. With ChatKit, developers can create AI-powered chatbots that understand and respond to user inputs naturally.
2. How do I get an OpenAI API key?
To get an OpenAI API key, follow these steps:
- Go to the OpenAI platform
- Create an account or log in if you already have one.
- Navigate to the API section of your account dashboard.
- Click “Create API Key” to generate your key.
- Copy the key and store it securely, as it is required to authenticate requests to OpenAI’s services.
3. Which frameworks can I use to integrate OpenAI ChatKit?
In this guide, we’ve demonstrated how to integrate OpenAI ChatKit using Laravel (PHP) and Flask (Python). However, you can use any backend framework such as Node.js, Django, or Ruby on Rails, as long as the framework supports making HTTP requests to external APIs.
4. Can I customize the ChatKit UI?
Yes! OpenAI ChatKit comes with a customizable chat UI that you can adjust according to your app’s design and branding. You can modify colors, fonts, layouts, and even add additional components to suit your needs. Customizing the ChatKit UI is straightforward, allowing you to provide a seamless and consistent experience for your users.
5. How do I scale my OpenAI-powered chatbot?
To scale your OpenAI-powered chatbot, consider the following:
- API Rate Limits: Be mindful of the rate limits imposed by OpenAI to ensure your application can handle a large number of requests. You may need to manage API calls and ensure your system can handle peak loads.
- Performance Optimization: Implement caching strategies to store frequently accessed data, reducing the number of API calls.
- Load Balancing: Use load balancers to distribute traffic evenly across servers and improve response times.
- Database Optimization: Store conversation threads and user data in an optimized database to manage large volumes of interactions.
These strategies will help you scale your chatbot efficiently as your user base grows.
Comments