
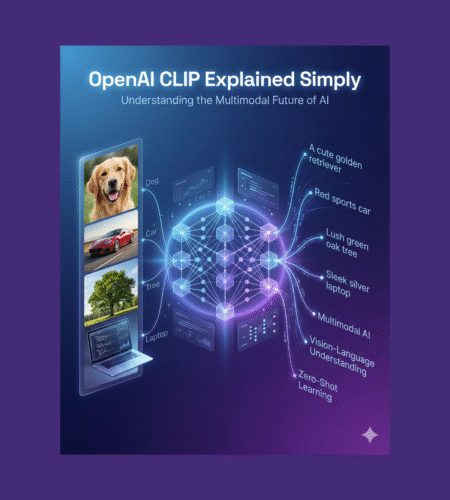
If you’ve ever wondered how AI can understand both images and text together, OpenAI CLIP is the answer you’re looking for. This powerful model is changing how we build applications that need to work with both visual and textual data.
In this guide, we’ll explore everything about OpenAI CLIP – from what it is to how you can start building with it today.
What is OpenAI CLIP?
OpenAI CLIP (Contrastive Language-Image Pre-training) is a neural network model that connects vision and language. Think of it as a bridge between images and text – it can understand what’s in an image and match it with relevant text descriptions, or vice versa.
Unlike traditional image recognition models that can only identify specific pre-trained categories (like “cat” or “dog”), OpenAI CLIP can understand natural language descriptions. This means you can search images using plain English phrases, not just fixed labels.
How does it work?
CLIP was trained on 400 million image-text pairs collected from the internet. During training, it learned to predict which text snippet goes with which image. This simple but powerful approach makes CLIP incredibly versatile.
How OpenAI CLIP Works Internally
To truly understand the power of OpenAI CLIP, let’s peek under the hood and see how it actually works.
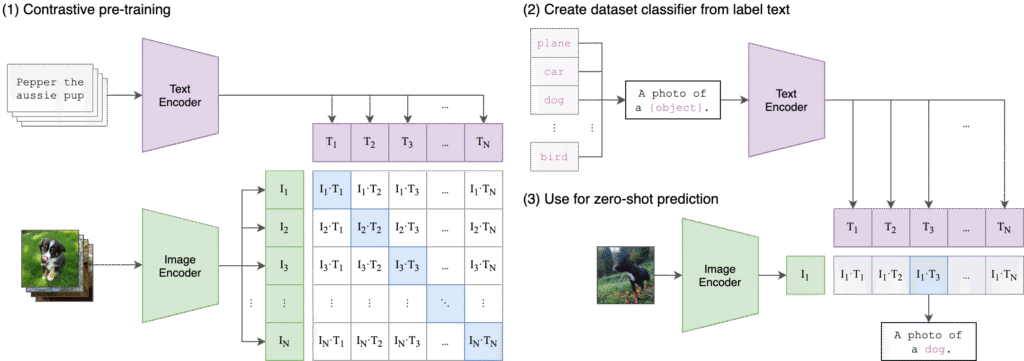
The Architecture
OpenAI CLIP consists of two main components working together:
1. Image Encoder: This processes images and converts them into embeddings (numerical representations). CLIP uses a Vision Transformer (ViT) or a ResNet-based architecture depending on the model variant.
2. Text Encoder: This processes text descriptions and converts them into embeddings of the same dimensionality as the image embeddings. It uses a Transformer architecture similar to GPT models.
The Training Process
Here’s where CLIP’s genius lies. Instead of training on labeled datasets (like “this is a cat”), CLIP was trained using a contrastive learning approach:
Step 1: Collect Image-Text Pairs CLIP was trained on 400 million image-text pairs scraped from the internet. These are images with their captions, alt-text, or surrounding text.
Step 2: Create a Batch During training, CLIP takes a batch of, say, 32,000 image-text pairs.
Step 3: Calculate Similarity For each image, CLIP calculates its similarity score with all text descriptions in the batch. This creates a 32,000 x 32,000 similarity matrix.
Step 4: Contrastive Learning The model is trained to:
- Maximize similarity between correct image-text pairs (the diagonal of the matrix)
- Minimize similarity between incorrect pairs (all other positions)
This is called contrastive learning because the model learns to contrast correct pairs against incorrect ones.
What Happens During Inference?
When you use CLIP to classify an image:
- Image Encoding: Your image is passed through the image encoder, producing an image embedding vector
- Text Encoding: Your category labels (like “cat”, “dog”, “bird”) are passed through the text encoder, producing text embedding vectors
- Similarity Calculation: CLIP calculates the cosine similarity between the image embedding and each text embedding
- Softmax: These similarity scores are converted into probabilities using softmax
- Prediction: The category with the highest probability is your prediction
The beauty is that both image and text live in the same embedding space, making direct comparison possible. This is why CLIP can work with categories it has never seen before – it just needs a text description.
Why This Approach is Powerful
Traditional image classifiers learn to map images to fixed categories (ImageNet’s 1000 classes, for example). If you want to recognize something new, you need to retrain the entire model.
CLIP, on the other hand, learns a general understanding of how images and text relate. Give it any text description, and it can match images to it. This is called “zero-shot learning” – learning without explicit examples.
Key Capabilities of OpenAI CLIP
Now that you understand how OpenAI CLIP works internally, let’s explore what it can do:
1. Zero-Shot Image Classification
You can classify images into categories that CLIP has never explicitly seen during training. Just provide text labels, and CLIP will match images to the most relevant label.
2. Image Search with Natural Language
Search through image collections using everyday language. Instead of tags, you can search with phrases like “a dog playing in the park” or “sunset over mountains.”
3. Multi-Modal Understanding
CLIP creates embeddings (numerical representations) for both images and text in the same space. This means you can compare images with text directly.
4. Transfer Learning
Use CLIP as a feature extractor for your custom computer vision tasks. It works well even with limited training data.
Getting Started with OpenAI CLIP
Let’s get your hands dirty with OpenAI CLIP. The setup process is straightforward, and you’ll be running your first experiment in minutes.
OpenAI CLIP Install: Installation Methods
There are two main ways to get started with OpenAI CLIP:
Method 1: Install via OpenAI CLIP PIP
The easiest way is using pip. Open your terminal and run:
pip install git+https://github.com/openai/CLIP.git
You’ll also need PyTorch installed. If you don’t have it:
pip install torch torchvision
Method 2: Clone from OpenAI CLIP GitHub
If you want access to the source code and examples:
git clone https://github.com/openai/CLIP.git
cd CLIP
pip install -e .
The OpenAI CLIP GitHub repository contains valuable resources, including pre-trained models, documentation, and example notebooks.
Your First CLIP Program
Here’s a simple example to get you started:
import torch
import clip
from PIL import Image

# Load the model
device = "cuda" if torch.cuda.is_available() else "cpu"
model, preprocess = clip.load("ViT-B/32", device=device)

# Prepare the image
image = preprocess(Image.open("photo.jpg")).unsqueeze(0).to(device)

# Prepare text descriptions
text = clip.tokenize(["a dog", "a cat", "a bird"]).to(device)

# Get predictions
with torch.no_grad():
    image_features = model.encode_image(image)
    text_features = model.encode_text(text)

    # Calculate similarity
    logits_per_image, logits_per_text = model(image, text)
    probs = logits_per_image.softmax(dim=-1).cpu().numpy()

print("Predictions:", probs)
This code loads an image and determines which text description matches best.
Real-World Use Cases and Products You Can Build
OpenAI CLIP opens doors to numerous practical applications. Here are some exciting use cases:
1. Intelligent Image Search Engine
Build a Google Images alternative where users can search with natural descriptions. Perfect for e-commerce sites, stock photo platforms, or personal photo libraries.
Example: A user searches “red shoes with white laces” and your system finds matching products even if they weren’t tagged with those exact words.
2. Content Moderation System
Automatically flag inappropriate content by checking if images match descriptions like “violence,” “adult content,” or “offensive material.”
3. Visual Question Answering
Create applications where users can ask questions about images. For example, “Is there a person in this image?” or “What color is the car?”
4. Automatic Image Tagging and Captioning
Generate relevant tags for images automatically. Great for organizing large photo collections or improving SEO for image-heavy websites.
5. Product Recommendation Systems
Match products based on visual similarity and text descriptions. Show customers items that match their style preferences described in natural language.
6. Accessibility Tools
Build applications that describe images to visually impaired users in natural language.
7. Creative Design Assistants
Help designers find reference images or assets by describing what they’re looking for.
8. Social Media Analysis
Analyze images and their contexts on social platforms to understand trends, sentiment, or brand presence.
Advanced Implementation: Building an Image Classifier
Let’s build a practical zero-shot classifier:
import torch
import clip
from PIL import Image
import os

class CLIPClassifier:
    def __init__(self, model_name="ViT-B/32"):
        self.device = "cuda" if torch.cuda.is_available() else "cpu"
        self.model, self.preprocess = clip.load(model_name, device=self.device)

    def classify_image(self, image_path, categories):
        # Load and preprocess image
        image = self.preprocess(Image.open(image_path)).unsqueeze(0).to(self.device)

        # Prepare text prompts
        text_inputs = clip.tokenize([f"a photo of a {c}" for c in categories]).to(self.device)

        # Calculate features
        with torch.no_grad():
            image_features = model.encode_image(image)
            text_features = model.encode_text(text_inputs)

            # Normalize features
            image_features /= image_features.norm(dim=-1, keepdim=True)
            text_features /= text_features.norm(dim=-1, keepdim=True)

            # Calculate similarity
            similarity = (100.0 * image_features @ text_features.T).softmax(dim=-1)

        # Get results
        values, indices = similarity[0].topk(len(categories))

        results = {}
        for value, index in zip(values, indices):
            results[categories[index]] = f"{100 * value.item():.2f}%"

        return results

# Usage
classifier = CLIPClassifier()
categories = ["dog", "cat", "bird", "car", "tree"]
results = classifier.classify_image("test_image.jpg", categories)
print(results)
Tips for Working with OpenAI CLIP
Based on practical experience, here are some tips to get the best results:
1. Craft Better Text Prompts
Instead of single words, use descriptive phrases. “A photo of a {category}” works better than just “{category}”.
2. Choose the Right Model
OpenAI CLIP comes in different sizes. ViT-B/32 is faster but less accurate. ViT-L/14 is slower but more accurate. Choose based on your needs.
3. Handle Edge Cases
CLIP might struggle with abstract concepts or highly specific technical images. Test thoroughly with your domain-specific data.
4. Optimize for Speed
Batch process images when possible. Pre-compute embeddings for text categories if they don’t change often.
5. Fine-Tune When Needed
For specialized domains, consider fine-tuning CLIP on your specific dataset for better performance.
Common Challenges and Solutions
Challenge 1: Slow Inference Speed
Solution: Use a smaller model variant, implement batching, or use GPU acceleration. Consider caching embeddings for frequently used images or text.
Challenge 2: Memory Issues
Solution: Process images in smaller batches, use a lighter model, or resize images before processing.
Challenge 3: Accuracy on Domain-Specific Data
Solution: Improve your text prompts, provide more context, or fine-tune the model on your specific domain.
Resources to Learn More
To dive deeper into OpenAI CLIP:
- Official GitHub Repository: Visit the OpenAI CLIP GitHub page at https://github.com/openai/CLIP for documentation, model weights, and examples
- Research Paper: Read the original CLIP paper to understand the underlying concepts
- Community Projects: Explore GitHub for community-built projects using CLIP
- Model Variants: Experiment with different CLIP model sizes available in the repository
Conclusion
OpenAI CLIP is a powerful tool that bridges the gap between computer vision and natural language processing. Whether you’re building an image search engine, content moderation system, or any application that needs to understand both images and text, CLIP provides a solid foundation.
The best part? Getting started is simple. With just a few lines of code and the OpenAI CLIP PIP installation, you can begin experimenting today. Clone the OpenAI CLIP GitHub repository, try the examples, and start building your own vision-language applications.
The possibilities are endless – from e-commerce product matching to accessibility tools, from content moderation to creative design assistants. What will you build with OpenAI CLIP?
Start experimenting today, and you’ll quickly realize why CLIP has become one of the most popular models for multi-modal AI applications. The openai/clip install process is straightforward, the documentation is excellent, and the community is active and helpful.
Happy coding, and welcome to the exciting world of vision-language AI!
Comments